Looking at a Linux CVE with REVEN 2.8.2
by Louis and Quentin
Categories: REVEN -
Tags: Linux - Reverse Engineering - Vulnerability Detection - Analysis API - Taint - REVEN -
Discover Timeless Analysis Live.
Want to analyze Linux systems or applications using Tetrane’s Timeless Debugging and Analysis (TDnA) platform? The freshly released REVEN 2.8.2 adds official support for Linux to the Professional edition!
In this article, we will see a step by step analysis of a recent vulnerability–CVE-2021-3156– from the record of an exploit to the automatic detection of the vulnerability in the resulting REVEN scenario. CVE-2021-3156 (“Baron Samedit”) is a heap buffer-overflow in the sudo library that could lead to privilege escalation. The CVE was discovered by Qualys and you can read the original write-up for the CVE on their blog.
The scenario was recorded on a Fedora 27 VM that is ready to be used with REVEN: it uses a supported kernel version, contains debug binaries and is preconfigured for REVEN.
This VM, as well as an Ubuntu 16.04 VM, is available from Tetrane’s website to download.
Recording the exploit
The exploit we chose to record is available on GitHub. It is written in Python, and aims at creating a new root account by writing in /etc/passwd.
This is possible even without knowing the sudo password because sudo is a root setuid program, so as soon as you can exploit vulnerabilities through sudo, the entire
system is at risk.
To reduce the size of the scenario as much as possible, we used the ASM stub recording mode of REVEN. This allows to start and stop the recording from within the guest VM, when specific ASM instructions are executed.
We provide the ASM stub commands as a python module on GitHub. In our record, we directly modified the Python code of the exploit to integrate the ASM stub in the following way:
- Add a call to start the record right before performing
execvetosudoon line 72:
def execve(filename, cargv, cenvp):
    asm_stub.start_record()
    libc.execve(filename, cargv, cenvp)
- Stop the record as soon as the child
sudoprocess finishes, so after thewaitpidon lines 78, 103, and 107:
def spawn_raw(filename, cargv, cenvp):
    pid = os.fork()
    if pid:
        # parent
        _, exit_code = os.waitpid(pid, 0)
        asm_stub.stop_record()
- Commit the record if everything went well, abort it otherwise:
        if exit_code == 0:
            print("success at %d" % i)
            asm_stub.commit_record()
            break
        if exit_code not in (6, 7, 11):
            print("invalid offset. exit code: %d" % exit_code)
            asm_stub.abord_record()
            break
Replaying the recorded scenario
After recording the scenario, the next step is to replay it.
This scenario turns out to be quite big for a Linux one: 4.3G instructions. Further, it looks like it would be difficult to reduce this scenario, because the execve of sudo is
at the start of the scenario, and the write to /etc/passwd at the end.
As the exploit builds a big buffer for the buffer overflow and sets many environment variables,
we spend most of this time manipulating buffers, especially in the rebuild_env function of sudo.
To understand if the scenario contains unwanted noise source from other system activity, we ran the notebook here to compute the percentage of execution for each process in the scenario, and sudo was executed for 95% of the scenario! All the recorded instructions might be relevant to the analysis.
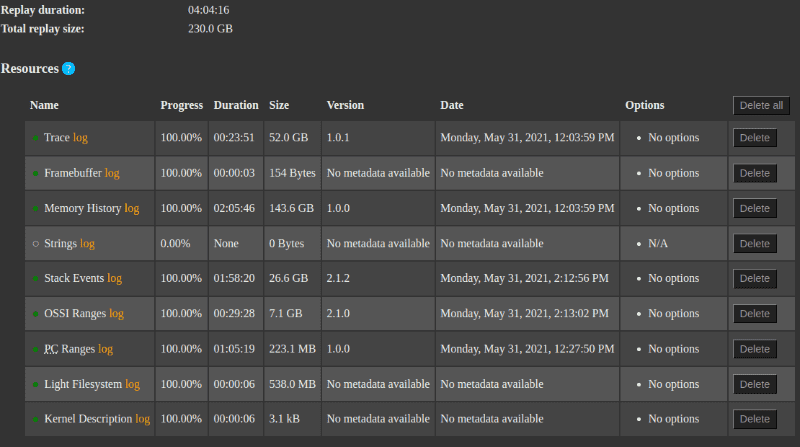
On the machine it was recorded on (a moderately powerful workstation: Intel Core i5-11600K (3.9 GHz / 4.9 GHz), 32GB DDR4 RAM, 1TB NVMe SSD), the replay took a total of 4 hours:

The replayed scenario takes 230GB on disk, including the trace, memory history, debug symbols, and various useful indexes.
Getting the debug symbols
Debug symbols, if available, are very useful when analyzing a scenario, as they give semantic meaning to the code that is being executed. Under Linux, the symbols are often contained in debug versions of the binaries. However, generally the non-debug version of the binaries are executed, leading to missing symbols in REVEN.
We provide a script that acts as a drop-in replacement for the light filesystem extraction script in REVEN. For Linux scenarios in VMs that contain the debug versions of binaries, the script extracts these instead of the binaries that actually ran while recording the scenario.
To use the script, grab it from GitHub, and replace the extract_light_fs binary in the share/reven/bin/ directory of your REVEN installation. In future versions of REVEN, symbols from the debug versions of binaries will be extracted by without having to modify your installation.
Browsing the trace
Let’s open the scenario in Axion and see what points of interest we can find!
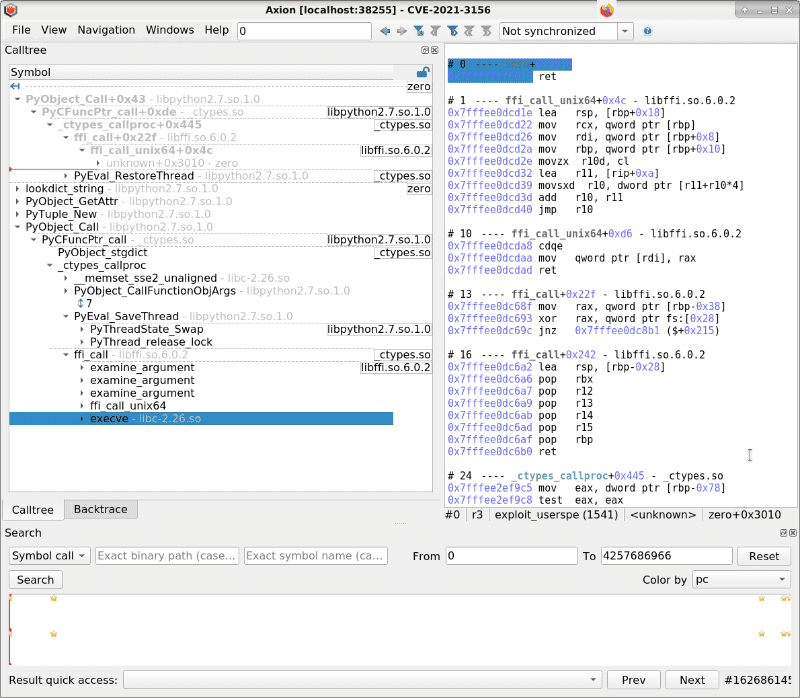
Looking at the calltree widget, we can see that we are in the middle of the Python code:

The calltree indicates that we will perform an execve through a ffi_call. This corresponds to the call to libc.execve in the exploit.
To find the sudo process created by execve, let’s do a symbol call search for ld-2.26.so!_dl_start.
This returns 3 results, corresponding to the 3 processes created during the trace:
- #86724178:
sudo (1541) - #3418588674:
unix_chkpwd (1542) - #4188607036:
tee (1543)
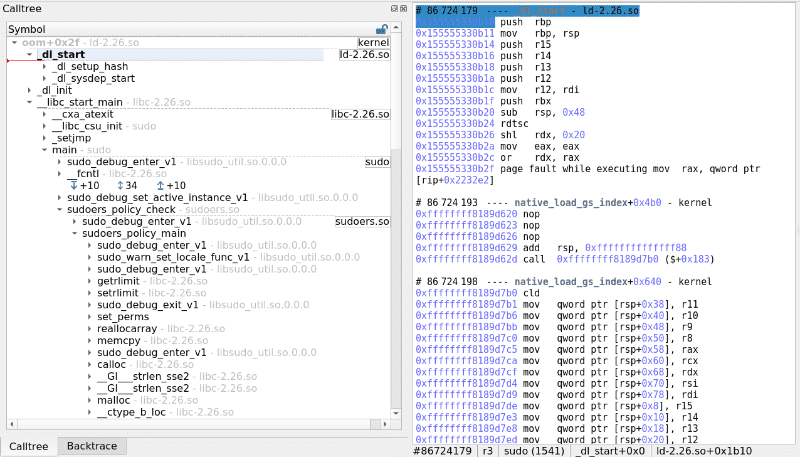
Going to #86724178, the calltree view informs us of the whole execution of sudo:

In particular, we can see the vulnerable function sudoers_policy_main. Of interest are the calls to __ctype_b_loc that is a libc private function used to compute the answer to the isspace, isalpha, isupper, etc. family of functions. From reading the write-up, the buffer overflow certainly occurs around these calls.
If we were to look for this buffer overflow in REVEN, why not detect it automatically?
Automatic detection of the Buffer Overflow
Without even opening the trace in the GUI, we can try and detect the Buffer Overflow using our Buffer Overflow detection notebook.
We already used this notebook to detect the buffer overflow vulnerability in this CVE, albeit on a different scenario that was recorded in a different VM and was just a crash, not an exploit.
Running the notebook on today’s scenario produces the following output (shortened for brevity):
...
Phys:0x571a5780: Allocated at #243722977 (0x55555578a780 of size 0x1972) and freed at N/A
    BOF coming from reg r15[0-8] leading to dereferenced address = 0x55555578c0f2
    #243803914 mov byte ptr [r15-0x1], dil sudoers!sudoers_policy_main+0x440

Phys:0x571a5780: Allocated at #243722977 (0x55555578a780 of size 0x1972) and freed at N/A
    BOF coming from reg r15[0-8] leading to dereferenced address = 0x55555578c0f3
    #243803926 mov byte ptr [r15-0x1], dil sudoers!sudoers_policy_main+0x440

Phys:0x571a5780: Allocated at #243722977 (0x55555578a780 of size 0x1972) and freed at N/A
    BOF coming from reg r15[0-8] leading to dereferenced address = 0x55555578c0f4
    #243803938 mov byte ptr [r15-0x1], dil sudoers!sudoers_policy_main+0x440

Phys:0x571a5780: Allocated at #243722977 (0x55555578a780 of size 0x1972) and freed at N/A
    BOF coming from reg r15[0-8] leading to dereferenced address = 0x55555578c0f5
    #243803950 mov byte ptr [r15-0x1], dil sudoers!sudoers_policy_main+0x440
...
So the notebook is able to detect the vulnerability again in today’s scenario. The ability to detect buffer overflow and use-after-free vulnerabilities at the full-system level even in the absence of a crash is a strength of REVEN. Please refer to our previous articles on vulnerability detection for more information.
Conclusion
With REVEN 2.8.2, recording Linux scenarios is easier than ever, with the official support in the Professional Edition!
Already a REVEN user? Jump right into Linux analysis with our provided VMs!
Want to try REVEN? You just need to click this link to start your own REVEN instance, on the Linux scenario of this very article! We also just added other new demos running with REVEN 2.8.2, so visit our Try REVEN page to start! Feel free to come back to us with your feedback and questions!
Discover Timeless Analysis Live.

